Kayak Fishing Knots: 7 Reliable Knots and When to Use Them
Reliable kayak fishing knots do not need to be complicated. A small set of well-practiced connections can cover most freshwater, inshore, and light saltwater situations without forcing you to remember a dozen different tying sequences while the kayak is drifting.
The most useful knot depends on the job: joining braid to a leader, attaching line to a hook or lure, or leaving a small loop so an artificial lure can move more freely. Line type and diameter matter too. A knot that works well with braid is not automatically the best choice for heavy fluorocarbon, and a compact leader knot may matter more when the connection repeatedly passes through rod guides.
This guide focuses on seven practical knots, what each one does well, and which connections are easiest to keep in a simple kayak-fishing system.
Table of Contents
Quick Answer: Useful Kayak Fishing Knots
There is no single strongest or best fishing knot across every line type, diameter, lure, and connection. For a kayak angler, a better goal is to learn a small group of knots with clearly different jobs.
| Situation | Useful Knot | Why Consider It |
|---|---|---|
| Low-profile braid-to-leader connection | FG Knot | Popular leader connection when a slim knot through the guides matters |
| Practical braid-to-leader connection | Alberto Knot | Compact and comparatively straightforward to learn |
| Simple line-to-line connection | Double Uni Knot | Easy to understand and especially useful with lines of similar diameter |
| Line to hook or lure | Palomar Knot | Simple, strong, and widely recommended for braided line |
| Mono or fluorocarbon to terminal tackle | Improved Clinch Knot | Common terminal knot for lighter and moderate line sizes |
| Versatile terminal connection | Uni Knot | Works as a terminal knot and is easy to adapt |
| Lure connection with a free-moving loop | Non-Slip Loop Knot | Leaves a loop at the eye so appropriate lures can move more freely |
If you are just building a knot system, the Alberto, Palomar, and Non-Slip Loop cover three different jobs without much overlap: leader connection, snug terminal connection, and loop connection.
A Simple 3-Knot Kayak Fishing System
A three-knot system is enough for many trips. The point is not that these three knots outperform every alternative. They are useful because each solves a different rigging problem and they are practical to learn as a set.
| Knot | Main Job | Good Fit |
|---|---|---|
| Alberto Knot | Braid to mono or fluorocarbon leader | Freshwater and inshore rigs where a compact leader connection is useful |
| Palomar Knot | Line to hook, jig, swivel, or suitable lure | Especially useful with braid and simple terminal tackle |
| Non-Slip Loop Knot | Leader to lure with a loop at the eye | Jerkbaits, topwaters, soft plastics, and other lures that benefit from added freedom of movement |
Once those are comfortable, the FG knot can be added when you want a lower-profile braid-to-leader connection, while the Uni and Double Uni provide useful backup options.
If you are still simplifying the rest of your setup, see our guide to beginner kayak fishing mistakes.
Why Knot Choice Matters From a Kayak
A knot does the same mechanical job whether you are fishing from shore, a bass boat, or a kayak. What changes in a kayak is the workspace. Wind, current, wakes, limited deck space, and nearby gear can make retying more awkward, which increases the value of knots you can reproduce consistently.
A practical kayak knot system should help you:
- Connect braid to mono or fluorocarbon leaders without carrying unnecessary rigging hardware.
- Retie common hooks, jigs, and lures without a complicated sequence.
- Choose a lower-profile connection when a leader knot repeatedly passes through rod guides.
- Inspect and replace damaged line after contact with rocks, shell, docks, wood, or other abrasive structure.
If wind is making boat control difficult enough that tying becomes a problem, solve the positioning issue first. Our kayak fishing in the wind guide covers that side of the problem.
Braid-to-Leader Knots for Kayak Fishing
Braided main line paired with a monofilament or fluorocarbon leader is common in both freshwater and inshore fishing. The leader connection should match the relative line diameters, the length of leader, and whether the knot will stay outside the guides or pass through them repeatedly.
1. FG Knot: Low-Profile Leader Connection
The FG knot is a popular braid-to-leader connection when minimizing knot bulk matters. Seaguar includes the FG in its current knot guide for braid-to-leader applications.
Consider the FG when:
- The leader connection will pass through the guides frequently.
- You want to run a relatively long leader.
- You have practiced the knot enough to maintain braid tension and seat the wraps correctly.
Tradeoff: The FG has more technique sensitivity than simpler line-to-line knots. A cleanly tied Alberto or Double Uni is preferable to an FG that has loose, crossed, or poorly seated wraps.
2. Alberto Knot: Practical Braid-to-Leader Connection
The Alberto knot is a compact leader connection that is easier for many anglers to reproduce than the FG. Seaguar’s knot guide describes its Crazy Alberto variation as a strong, easy-to-tie braid-to-leader knot.
Consider the Alberto when:
- You want a compact braid-to-leader knot without the tying process of an FG.
- You need an everyday freshwater or inshore leader connection.
- The main line and leader have noticeably different diameters.
Tradeoff: It is bulkier than a well-tied FG, so a long leader may create more guide contact.
3. Double Uni Knot: Simple Line-to-Line Connection
The Double Uni is easy to visualize because each line receives its own Uni knot and the two knots are pulled together. Berkley recommends the Uni-to-Uni for joining lines of similar diameter and notes that an Albright-style connection is worth considering when the diameters differ substantially.
Consider the Double Uni when:
- You want an easy-to-remember line-to-line connection.
- The two lines are reasonably close in diameter.
- The leader is short enough that a bulkier connection will not pass through the guides repeatedly.
Tradeoff: It creates more bulk than the FG and can become less attractive as the diameter difference between braid and leader increases.
Terminal Knots for Hooks and Lures
Terminal knots connect the line or leader to a hook, jig, swivel, or lure. These are often the connections you retie most frequently, so repeatability matters as much as theoretical knot strength.
1. Palomar Knot
The Palomar is a simple terminal knot widely recommended for braided line. Berkley describes it as strong, simple to tie, and well suited to braid.
Good uses:
- Braid to hooks or jigs.
- Line to swivels and other terminal tackle that can pass through the doubled-line loop.
- Many compact lures where passing the lure through the loop is practical.
Tradeoff: Large hard baits or complicated rigs can make the step of passing the entire lure through the loop awkward.
2. Improved Clinch Knot
The Improved Clinch is a familiar terminal knot for monofilament and fluorocarbon. Berkley recommends five to seven turns in its current instructions and notes that the knot becomes difficult to tie in lines over about 30-pound test.
Good uses:
- Mono or fluorocarbon to hooks, swivels, and smaller lures.
- Light and medium line where the coils seat cleanly.
Tradeoff: It is not the default choice here for braided line, and heavier or stiffer leaders may call for a different terminal connection.
3. Uni Knot
The Uni is useful because the same basic knot structure can be used as a terminal connection and as part of the Double Uni line-to-line connection. Berkley’s terminal instructions use six turns before the knot is moistened and tightened.
Good uses:
- Mono, fluorocarbon, or appropriate braid applications to hooks and terminal tackle.
- Anglers who prefer one adaptable knot instead of learning several similar terminal knots.
4. Non-Slip Loop Knot
A non-slip loop knot leaves a small loop between the leader and lure rather than cinching directly against the eye. Sufix/Rapala describes this style of connection as allowing a lure to move freely and naturally.
Good uses:
- Jerkbaits and twitch baits.
- Topwaters designed to walk or pivot freely.
- Jigheads and soft plastics where a loop connection improves the presentation.
It is especially relevant to inshore artificials. For examples of paddle tails, jerk shads, and shrimp-style plastics used for redfish, see our soft plastics for redfish guide.
Step-by-Step Tying Instructions
Line diameter, material, and the specific variation of a knot can change the number of wraps used. Practice with the line you actually fish and compare your finished knot with a reliable manufacturer demonstration before depending on it.
FG Knot: Braid to Leader
FG tying methods vary, particularly in how anglers maintain tension and finish the knot. The essential sequence is:
- Keep steady tension on the braid. The wraps need to stay controlled while they are formed around the leader.
- Cross the braid alternately around the leader. Build a clean series of close, even wraps without gaps or crossed coils.
- Seat the wraps under tension. The braid should grip the leader before the tag is trimmed.
- Lock and finish the connection. Common FG methods use locking half-hitches or a similar finish after the main wraps have seated.
- Trim carefully and pull test. If the wraps slip or separate, retie rather than trying to salvage the connection.
Because the exact wrap count and finish vary with line diameter and tying method, use the video demonstration above or Seaguar’s current FG knot guide as the visual reference rather than treating one wrap count as universal.
Alberto Knot: Braid to Leader
- Form a loop in the leader.
- Pass the braid through the leader loop. Leave enough tag to make controlled wraps.
- Wrap the braid around both strands of the leader loop. Work away from the loop with close, even wraps.
- Reverse direction and wrap back over the first layer.
- Pass the braid tag back through the original leader loop in the same direction it entered.
- Moisten and tighten gradually. Keep the wraps organized while the knot seats.
- Pull test before trimming close.
Wrap counts vary with line size and the Alberto variation being tied. Consistent, orderly wraps and correct entry/exit direction matter more than copying one number across every braid and leader combination.
Double Uni Knot: Line to Line
- Overlap the main line and leader by several inches.
- Form a loop with the first tag end and make multiple turns around both lines through that loop.
- Snug the first Uni knot without pulling the two lines completely together.
- Repeat the same process with the second line.
- Moisten the connection and pull the two standing lines in opposite directions so the Uni knots slide together.
- Pull test, then trim the tag ends.
Berkley’s current Uni-to-Uni instructions use six to eight turns on each side as a general example, but the appropriate number can change with material and diameter.
Palomar Knot: Line to Hook or Lure
- Double roughly 6 inches of line and pass the doubled line through the eye.
- Tie a loose overhand knot with the doubled line, keeping the hook or lure hanging below it.
- Pass the hook or lure completely through the large loop.
- Make sure the doubled strands are not crossed or twisted against each other.
- Moisten and draw the knot tight with even pressure.
- Pull test and trim the tag.
These steps follow Berkley’s current Palomar instructions. The most common practical problem is allowing the doubled strands to cross before the knot is seated.
Improved Clinch Knot: Mono or Fluorocarbon Terminal Knot
- Pass the line through the eye and leave roughly 6 inches of tag.
- Wrap the tag around the standing line five to seven times.
- Pass the tag through the small loop immediately above the eye.
- Pass the tag through the larger loop created by the previous step.
- Moisten and tighten while keeping the coils from overlapping.
- Pull test and trim the tag.
Berkley notes that this knot becomes harder to tie in lines over about 30-pound test, so heavier leader material may call for another connection.
Uni Knot: Terminal Connection
- Pass the line through the eye and double it back to form a loop alongside the standing line.
- Wrap the tag around the doubled section and through the loop. Berkley’s current example uses six turns.
- Moisten and pull the tag to draw the coils together.
- Pull the standing line to slide the knot toward the eye.
- Pull test and trim the tag.
Non-Slip Loop Knot: Lure Connection
Several closely related non-slip loop variations are used in fishing. A common sequence is:
- Tie a loose overhand knot in the leader several inches from the tag end.
- Pass the tag through the lure eye and then back through the overhand knot.
- Wrap the tag around the standing line several times.
- Return the tag through the overhand-knot opening in the correct direction for the variation you are tying.
- Moisten and tighten while controlling the size of the finished loop.
- Pull test and trim the tag.
The loop should be large enough to let the lure articulate but not so large that it creates unnecessary fouling. Use the included video demonstration as the visual reference for the exact sequence.
How to Choose the Right Knot
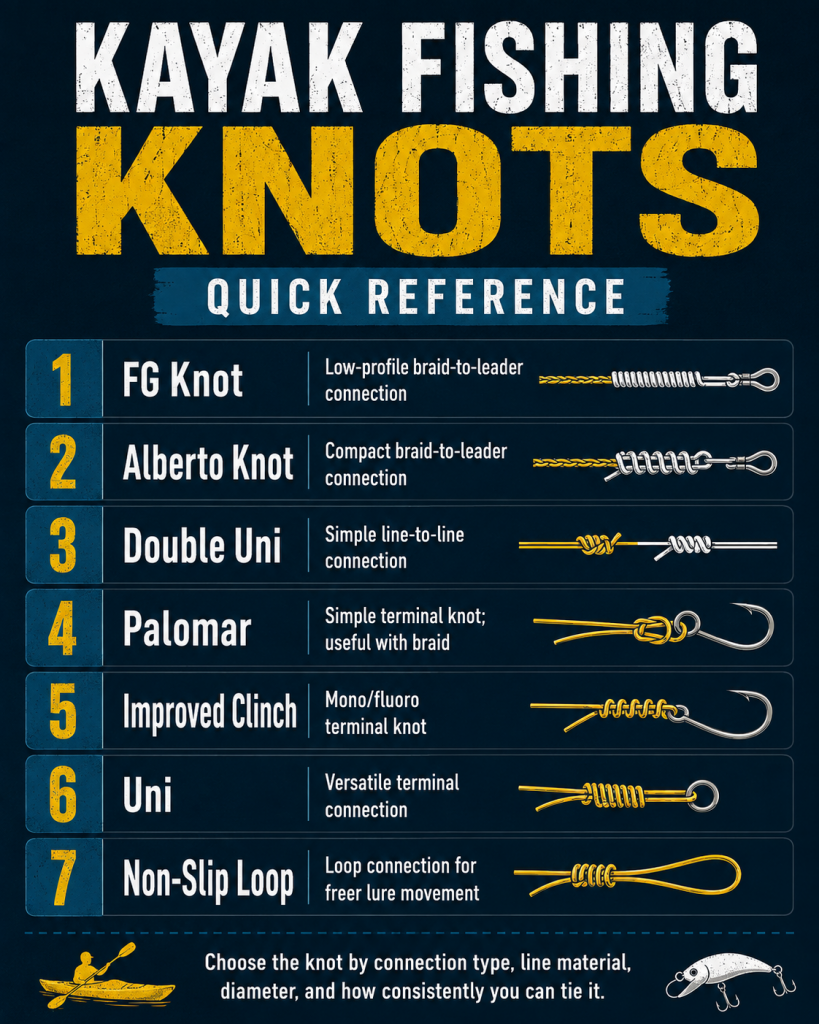
Choose by connection type first, then account for line material, diameter, leader length, and the lure or terminal tackle.
| Need | First Knot to Consider | Alternative |
|---|---|---|
| Slim braid-to-leader connection that enters the guides | FG Knot | Alberto Knot |
| Practical braid-to-leader connection | Alberto Knot | Double Uni |
| Joining lines of relatively similar diameter | Double Uni | Alberto/Albright-style connection |
| Braid to compact hook or terminal tackle | Palomar Knot | Uni Knot |
| Mono/fluoro to smaller terminal tackle | Improved Clinch | Uni Knot |
| Free-moving lure connection | Non-Slip Loop | Snug Uni when a fixed connection is preferred |
The best practical knot is often the one you can tie correctly with the line in your hands. If a connection repeatedly slips, deforms, or fails your pull test, change the tying method or knot instead of assuming the knot name alone guarantees strength.
Tying Knots When Conditions Are Difficult
If wind, current, wakes, or traffic make it hard to hold the line and tie accurately, the first problem is boat position—not knot selection.
1. Stabilize the Kayak First
Move away from traffic, structure, current hazards, or an exposed drift before trying to retie. Use a protected position, appropriate anchoring method, stakeout pole, pedal drive, or paddle control only when the conditions make that method safe.
2. Pre-Tie Leaders When Practical
Leader connections are easier to inspect on shore. Pre-rigging can reduce the need to tie an FG or other more involved connection while the boat is moving.
3. Use Enough Tag End to Tie Cleanly
Too little tag makes a knot difficult to control; excessive tag can tangle around rods, pedals, seat hardware, or other gear. Use enough line to complete the sequence comfortably, then trim only after the knot has passed a pull test.
4. Keep the Knot System Small
A short list of practiced knots is more useful than a large collection you rarely tie. Repetition makes it easier to notice when wraps, entry direction, or seating look wrong.
5. Practice With the Line You Actually Use
Thin braid, stiff fluorocarbon, soft monofilament, and heavy leader material do not handle the same way. Practice with your real line combinations and test the finished connections before relying on them on the water.
Common Kayak Fishing Knot Mistakes
Not Moistening a Knot That Should Be Moistened
Berkley’s instructions for the Palomar, Uni, Improved Clinch, and Uni-to-Uni all call for moistening before the knot is fully tightened. This helps the coils seat as the connection is drawn together.
Accepting Crossed or Uneven Wraps
If a knot depends on orderly coils or wraps, crossed strands are a reason to retie. This matters with the FG, Alberto, Clinch, Uni, and other wrap-based connections.
Ignoring Line Diameter
Some line-to-line knots are better suited to similar diameters than others. Berkley specifically recommends the Uni-to-Uni for lines of similar diameter and suggests an Albright-style connection when the difference is substantial.
Trimming Before the Pull Test
Seat and test the connection before trimming the tag extremely close. If a knot slips, rotates, or deforms during the test, cut it off and tie it again.
Retieing Onto Damaged Line
A perfect knot cannot restore line that has already been nicked or abraded. Cut back beyond damaged mono or fluorocarbon before retying, and inspect braid for fraying after contact with sharp structure.
Choosing Complexity Over Consistency
A more advanced knot is not an upgrade if you cannot reproduce it reliably. Use a connection you can tie cleanly, then practice alternatives at home before adding them to the on-water system.
FAQs About Kayak Fishing Knots
How many knots do I need for kayak fishing?
Three or four well-practiced knots can cover many trips. A practical starting system is an Alberto for braid to leader, a Palomar for snug terminal connections, and a Non-Slip Loop for lures that benefit from a loop. Add a Uni as a versatile backup.
What is the best knot for kayak fishing?
There is no single best knot because braid-to-leader, terminal, and loop connections do different jobs. The best choice depends on line material and diameter, the lure or hook, and whether you can tie the connection consistently.
Is the FG knot worth learning?
It can be, especially when a long leader means the connection repeatedly travels through the rod guides. The tradeoff is that the FG requires more practice and tension control than simpler alternatives such as the Alberto.
What is an easy braid-to-leader knot?
The Double Uni is easy to understand, particularly when the two lines are similar in diameter. The Alberto is also a practical option and is better suited to many braid-to-leader combinations with a larger diameter difference.
What knot works well for braid directly to a hook or lure?
The Palomar is a common first choice because it is simple and widely recommended for braided line. It works best when the hook or lure can be passed cleanly through the doubled-line loop.
Do I always need a leader with braid?
No. A leader may be useful for abrasion resistance, presentation, or specific rigging needs, but direct braid can make sense in some techniques and water conditions. Choose the system around the fishery and cover rather than treating a leader as mandatory.
How should I check a fishing knot before casting?
Inspect the wraps or coils, make sure the knot has seated cleanly, and give the connection a firm pull test. Retie if it slips, distorts, shows crossed wraps, or is attached to damaged line.
Sources and Method
This guide does not claim firsthand kayak-fishing knot testing. Knot roles and tying guidance were checked against current knot instructions from fishing-line manufacturers and the International Game Fish Association. Kayak-Fishing.com analysis is used to narrow those general fishing knots into a compact system that is practical in a small-craft workspace.
- Berkley — Fishing Knots 101
- Seaguar — Knot Guide
- Seaguar — Tie an FG Knot
- Seaguar — Crazy Alberto Knot
- Sufix / Rapala — Recommended Fishing Line Knots
- International Game Fish Association — Intro to Fishing Knot Lessons
Final Thoughts
The most useful kayak fishing knots are not necessarily the knots with the biggest reputation. They are the connections that fit the line and rigging job and that you can tie cleanly enough to trust.
A simple starting system is Alberto for braid to leader, Palomar for many hooks and terminal connections, and Non-Slip Loop for lures that benefit from a free-moving loop. Add the FG when a lower-profile leader connection is worth the extra practice, and keep the Uni or Double Uni available when their line and connection roles fit.
Practice with your actual braid, mono, and fluorocarbon, inspect every connection, and pull test before fishing. Consistent tying matters more than collecting more knot names.